This article describes how one can get some FreeBSD virtual instances on the Internet quick. For cost-saving, Vultr, which charges hourly, is used. The exercise will finish within an hour or two.
Objectives
- Start some FreeBSD instances
- Experiment some configurations
- Setup password-less logins
Step 0: Why (and why not) FreeBSD
FreeBSD is an operating system. If you are reading this article online, I am almost certain you know one particular operating system. There are various operating systems for daily computing activities—Windows, [M]acOS, iOS, Solaris, etc. (In case you want to say an L-word, click here.) In addition to one’s personal taste. The official website gives a perfect explanation.
FreeBSD is an advanced computer operating system used to power modern servers, desktops, and embedded platforms. A large community has continually developed it for more than thirty years. Its advanced networking, security, and storage features have made FreeBSD the platform of choice for many of the busiest web sites and most pervasive embedded networking and storage devices.
What would be valid reasons not to use FreeBSD? Indeed, there are also a lot but I like to put only one here. FreeBSD is best operated in commands, not mouse clicks. If you insist using only mouse clicks for your tasks, you are likely to try Microsoft Windows.
(As a side note, some would say FreeBSD is only a server operating system. You can watch some counter-examples in Charray’s YouTube channel or Riba’s channel. Once it is set up, the mental workload to use it is minimal. I had been using it for most of my research career and at least the mascot had not killed me!)
Step 1: Get an Online Account and Deposit
I feel like scamming telling you to prepaid for a service, but please trust me. There are of course postpaid services, but they are usually more expensive and less controllable. Think what happens in event of a bill shock. If you feel really uncertain, you can deposit as little as a few dollars. Best of all, the provider Vultr we use today accepts other payment methods like Paypal and Bitcoin, which helps you to reduce chance of having the credit card number stolen.
To register, fill in the “Create Account” form and answer the questions. You are reminded to use a valid email address since it is critical for creating virtual machines. The so-called “Password” field here does not refer to the password of your email account, but a new password for this new service. Never use your existing email password when applying other services.
After the first login, you will be guided to deposit some money to the account. Please check your email box and reply to the email verification as well.

Step 2: Submit a Form for Virtual Machines
Once you have deposited money, you can direct to the “Server” page. The plus sign on the far-right is the one for submitting for virtual machines.

In the form, you can first select the region closest to you, select “FreeBSD 11 x64”, “20 GB SSD” plan, and the “Enable Private Network” option. Leave the “Startup Scripts” and “SSH Keys” unselected. Your new account is not supposed to have any yet.

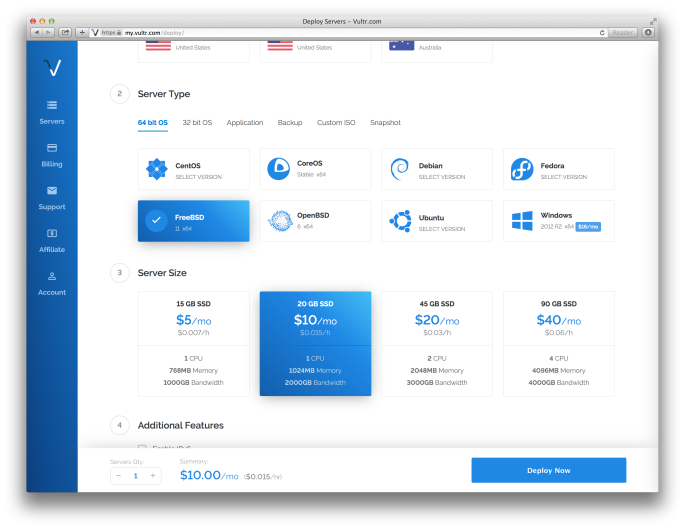

Once you are comfortable with the choice, click “Deploy Now”. No, soon you will discover, you are not getting charged 10 dollars immediately. Be brave.
Step 3: Wait
You can refresh faster by clicking the “Server” pane. The instance will go through several stages when it is in preparation—installing, resizing, starting, etc. But there is a catch. Once it is started, it is not necessary really started. In context of cloud provider, a machine is considered started even when it is booting through the firmware and startup scripts! By the way, you are being charged for one hour of usage—2 cents.


You can reveal a new page by clicking the machine name. Inside you can have options such as viewing the console, switching off the machine, reinstalling, etc. The password can also be revealed in an extra click.

Step 4: Login and some Configurations
With the given IP address, the username, and the password, you can login through the secured shell. For Unix-like operating systems, there is usually a tool “Terminal” where you can use the command “ssh” directly. (For Windows, you can consider using putty. It starts with a point-and-click interface for making the connection.) The basic command for the “ssh” is:
ssh <username>@<host>
And the dialog will be like:
Last login: Fri Jan 20 20:52:50 on ttys001

kinsonchan@almond ~% ssh root@45.76.147.176
The authenticity of host '45.76.147.176 (45.76.147.176)' can't be established.
RSA key fingerprint is 9c:1e:0e:9c:f0:ba:38:56:5a:9a:90:54:68:aa:aa:07.
Are you sure you want to continue connecting (yes/no)? yes
Warning: Permanently added '45.76.147.176' (RSA) to the list of known hosts.
Password for root@vultr.guest:
Last login: Fri Jan 20 12:59:05 2017
FreeBSD 11.0-RELEASE-p2 (GENERIC) #0: Mon Oct 24 06:55:27 UTC 2016

Welcome to FreeBSD!

Release Notes, Errata: https://www.FreeBSD.org/releases/
Security Advisories:   https://www.FreeBSD.org/security/
FreeBSD Handbook:      https://www.FreeBSD.org/handbook/
FreeBSD FAQ:           https://www.FreeBSD.org/faq/
Questions List: https://lists.FreeBSD.org/mailman/listinfo/freebsd-questions/
FreeBSD Forums:        https://forums.FreeBSD.org/

Documents installed with the system are in the /usr/local/share/doc/freebsd/
directory, or can be installed later with:  pkg install en-freebsd-doc
For other languages, replace "en" with a language code like de or fr.

Show the version of FreeBSD installed:  freebsd-version ; uname -a
Please include that output and any error messages when posting questions.
Introduction to manual pages:  man man
FreeBSD directory layout:      man hier

Edit /etc/motd to change this login announcement.
#
You can then edit the main configuration file. Unlike most operating systems, the configuration of FreeBSD is quite centralised to several files, mostly “/etc/rc.conf”. You can use “vi” if you like. But since you are reading this article, you are likely to use “ee” instead. As I will show in upcoming articles, I have some preferences in what services to enable and disable. I will edit the file with command:
ee /etc/rc.conf
And update the screen content as follows. Use arrow keys to navigate.
^[ (escape) menu ^y search prompt ^k delete line ^p prev li ^g prev page
^o ascii code    ^x search     ^l undelete line  ^n next li ^v next page
^u end of file   ^a begin of line ^w delete word   ^b back 1 char
^t top of text   ^e end of line   ^r restore word  ^f forward 1 char
^c command       ^d delete char   ^j undelete char ^z next word
=====line 6 col 17 lines from top 6 =====================================
hostname="vultr.guest"
sshd_enable="YES"
static_routes="linklocal"
ifconfig_vtnet0="DHCP"
sendmail_enable="NONE"
ntpd_enable="YES"
After that, press the “Esc” button for a menu, then “a” twice to save and exit. By the way, if you are experienced, the meaning of the file is literally setting the hostname and services. Unlike some other operating systems, in FreeBSD it is done all in one place. Neat.
Step 5: Password-less Login
Inside the same prompt, you can issue the command “ssh” to itself. Strangely, it asks you for a password.
# ssh localhost

The authenticity of host 'localhost (127.0.0.1)' can't be established.
ECDSA key fingerprint is SHA256:+.......
No matching host key fingerprint found in DNS.
Are you sure you want to continue connecting (yes/no)? yes
Warning: Permanently added 'localhost' (ECDSA) to the list of known hosts
Password for root@vultr.guest:
This is no good if you are asked the password for every login. Let us solve it with “ssh-keygen” and put it as a default login. For demonstration purpose, let us execute this on the same machine.
# ssh-keygen
Generating public/private rsa key pair.
Enter file in which to save the key (/root/.ssh/id_rsa):
Enter passphrase (empty for no passphrase):
Enter same passphrase again:
Your identification has been saved in /root/.ssh/id_rsa.
Your public key has been saved in /root/.ssh/id_rsa.pub.
The key fingerprint is:
SHA256:Er4yNuYmjvbmTOlJP6sNFCV6QuD++45MeFBv5A6QFmg root@vultr.guest
The key's randomart image is:
+---[RSA 2048]----+
|+o . .           |
|+E+ o            |
|.B + ..          |
|o = =. .         |
| o o +o S        |
|  = =  o         |
| . O*..          |
| oX=O=           |
|o.=&=*o          |
+----[SHA256]-----+
After the dialogue and the messy picture, what else do you get? Some files in the “.ssh” folder. You can list them with the “ls” command.
# ls .ssh
id_rsa  id_rsa.pub  known_hosts
The “id_rsa” is your private file. It should be kept within your own computers only, not those owned by anyone else. The “id_rsa.pub” is your public key. You can install it to the machines where you need the password-less login. The file content can be listed with “cat” command.
# cat .ssh/id_rsa.pub
ssh-rsa AAAAB3NzaC1yc2EAAAADAQABAAABAQD93syOQa78tYAysC52H/gUNIMQRjJpu/zKIbc0qFsGFouv9OtnehFix/EIeIBQmYIVv0gRmfI9qiFx2TQpkk0AHvmDew5VfWFeszfGOQnI3xU8hSeG7kKENMozGT+yh5RbjL6ZGRu/cWX5+K9M96kuNbI7CFU0p/muzqeQgOtYsGx+G1qnrW6K6EDFD8guNPF5JXBb88x8WaL7ooqNUZhTbLVIxHtycMqArka84Wvmvi3lJvVQGygid9qLO9WL8NaQ3KaithAR05sNoLw2y+AoXHfRLWoWRMrXvaVE3PrkntnLIi6Cvn/+HsuBdF71/cDu6TCLfU/SlTxdpYY/omez root@vultr.guest
This piece of string (from “ssh-rsa” to the end) can be put into the SSH key place of the cloud. Then, when you start a new machine next time (left as your exercise… do you have two more cents to try?), you can login without the password. What about the machines that are already provisioned, like the one we already have? Put them in “.ssh/authorized_keys”.

# mkdir -p .ssh
# chmod 0700 .ssh
# touch .ssh/authorized_keys
# chmod 0600 .ssh/authorized_keys
# cat .ssh/id_rsa.pub >> .ssh/authorized_keys
You can see the commands are all executed without a line of output. This is the philosophy of Unix—return nothing on success. After this, you will find the file “.ssh/authorized_keys” contains the line of the “.ssh/id_rsa.pub”. (You can verify this with the “ee” command.) If things are going well, “ssh localhost” this time should be connected without password.
Step 6: Clean up
When you are finished, go to the cloud provider page, select the machine, activate the pop-up menu and select “Server Destroy”. Hopefully, we finish this exercise before being charged too much.

In my case here, I have spent only three cents for demonstration on this blog. Three cents are way cheaper than my own manpower to find a computer and install FreeBSD thereon. This is why some people are so attracted to public cloud services.
In this article, we have went through starting FreeBSD instances, some basic configuration exercise, and finally experimented one of the ways for password-less login. Next week, we will likely continue with my preferred customisations and installing an example server application.
